
This is the first entry of a series that will cover how Britive secures Just-In-Time (JIT) access in various Kubernetes platforms.
Britive is a cloud-native platform for automating multi-cloud privilege identity management across data, infrastructure, and applications. By natively supporting JIT access to all major cloud service providers and SaaS applications, Britive extends CSPs’ identity and access management (IAM) capabilities and provides a modern unified access model with a single platform.
In this blog, we’ll cover how you can achieve JIT access for human identities in your Amazon Elastic Kubernetes Service (EKS) clusters. We look at the implementation basics, how to configure the access, and how to apply JIT access in EKS at scale. In future blog entries in this series we’ll look at the same approach in Google Cloud Platform and Azure.
Setup with Britive Profiles and PyBritive
We’ll map various components to achieve the result we expect. Britive Profiles allow us to introduce JIT access with approvals. PyBritive is the command line interface (CLI) tool that can be used by both Britive admins and end users. With PyBritive, we’ll enable the right permission on EKS via the AWS role to carry out actions using kubectl. The image below describes the mapping between various components:
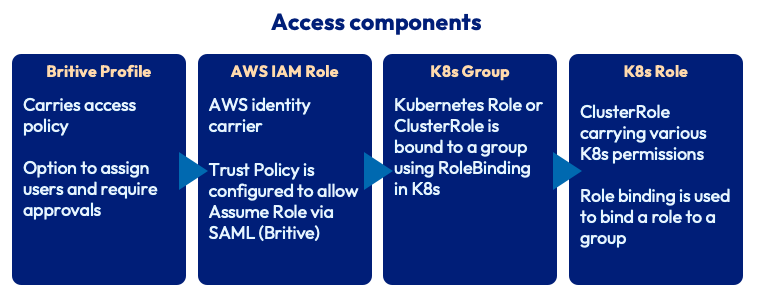
- Britive Profiles are configured to grant AWS IAM roles on a specific AWS account. Britive profiles can also be configured to require approvals amongst various other access control policies.
- AWS IAM Role is created and assigned a Trust Policy to allow users to assume that role vis a SAML Federation connection with Britive.
- AWS IAM ConfigMap allows us to map IAM roles to groups in Kubernetes.
A sample ConfigMap and Kubernetes RoleBinding are shown in the “Configuration” section of this blog below. We recommend binding Kubernetes roles to groups instead of a user directly: this simplifies access management and allows for greater control of cluster access. The process of creating a Kubernetes Role or ClusterRole along with the RoleBinding would be similar. The example below shows how we can create and grant permissions by leveraging Britive’s JIT Access Broker and ClusterRoles on Amazon EKS.
JIT access configuration example
In this use case, we’ll mimic the role of an application owner that manages their application environment on a pod or group of pods. A Pod Manager role allows users to carry out various operations on pods within the EKS cluster.
Create a ClusterRole with RoleBinding to a group. The code snippet below shows the YAML file for a ClusterRole and RoleBinding. We can use the kubectl apply command to create these entities in our cluster. This role allows for all actions on “pods.” A role called “pod-manager” will be created and will be bound to a group named “pod managers”:
---
apiVersion: rbac.authorization.k8s.io/v1
kind: ClusterRole
metadata:
  name: pod-manager
rules:
- apiGroups: [""] # "" indicates the core API group
  resources: ["pods"]
  verbs: ["*"]

---
apiVersion: rbac.authorization.k8s.io/v1
kind: ClusterRoleBinding
metadata:
  name: manage-pods-global
subjects:
- kind: Group
  name: pod-managers
  apiGroup: rbac.authorization.k8s.io
roleRef:
  kind: ClusterRole
  name: pod-manager
  apiGroup: rbac.authorization.k8s.io
Now we create an AWS IAM Role corresponding to this ClusterRole. We name this Role “EKS-Pod-Manager” and define the following trust relationship:
{
    "Version": "2012-10-17",
    "Statement": [
        {
            "Effect": "Allow",
            "Principal": {
                "Federated": "arn:aws:iam::196226166352:saml-provider/BritiveEngineeringV2-EA"
            },
            "Action": [
                "sts:AssumeRoleWithSAML",
                "sts:TagSession",
                "sts:SetSourceIdentity"
            ],
            "Condition": {
                "StringEquals": {
                    "SAML:aud": "https://signin.aws.amazon.com/saml"
                }
            }
        }
    ]
}
Let’s update the ConfigMap by running the following kubectl command:
kubectl edit -n kube-system configmap/aws-auth
Add the following lines to the ConfigMap in the MapRoles section:
- groups:
  - pod-managers
  rolearn: arn:aws:iam::196226166352:role/EKS-Pod-Manager
- Run the Environment Scan in Britive and bring the newly created AWS Role in to create a Profile.
- Create an “EKS Pod Manager” Profile and assign the EKS-Pod-Manager role as mapped permissions:
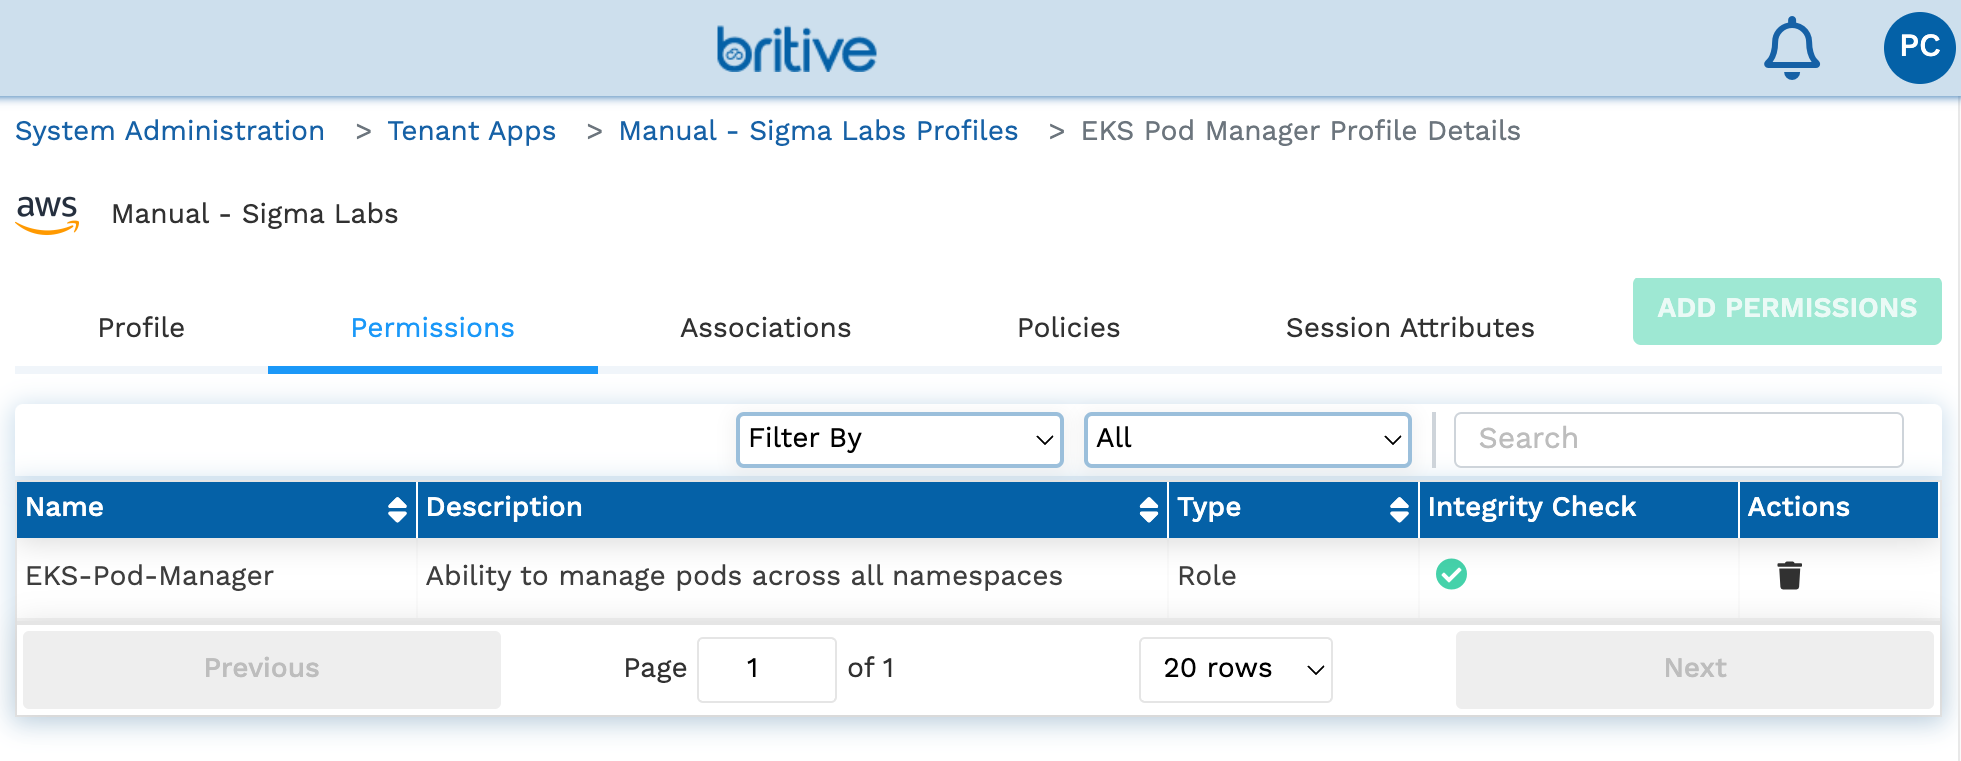
The EKS Pod Manager profile configured in Britive
The profile can now be assigned to users directly or via Tags.
When the above configurations are completed, the AWS ConfigMap will look like the example below. Each group is mapped to its appropriate AWS Role by using the rolearn value:
Name:         aws-auth
Namespace:    kube-system
Labels:       <none>
Annotations:  <none>

Data
====
mapRoles:
----
- groups:
  - system:bootstrappers
  - system:nodes
  rolearn: arn:aws:iam::196226166352:role/eksctl-britive-test-nodegroup-ng-NodeInstanceRole-WQQYK87F31Y7
  username: system:node:{{EC2PrivateDNSName}}
- groups:
  - readers
  rolearn: arn:aws:iam::196226166352:role/BritiveEKSReader
- groups:
  - pod-managers
  rolearn: arn:aws:iam::196226166352:role/EKS-Pod-Manager

mapUsers:
----
[]

BinaryData
====
This concludes the admin side configuration. Let’s move on to the user experience.
Developer-centric user experience
We’ll leverage PyBritive and some of its powerful end-user capabilities to demonstrate the configured use case. The profile eks-pod-manager will allow us to check out the corresponding profiles from Britive and perform necessary actions.
First, let’s set up the Britive environment. PyBritive allows configuring aliases for Profiles. These aliases can be used to checkout, check-in, or perform other necessary actions for a specific profile. With the following command, we can set an alias for our desired profile. “eks-pod-manager” is the alias we assign for the relevant Britive profile:
pybritive configure update profile-aliases eks-pod-manager "Manual - Sigma Labs/196226166352 (Sigma Labs)/EKS Pod Manager"
Now let’s add the following line to the AWS credentials file. This is typically located at “~/.aws/credentials“. The credential profile will be named “eks-pod-manager” to match the Britive alias:
[eks-pod-manager]
credential_process = pybritive checkout -m awscredentialprocess eks-pod-manager -t engv2-ea.britive-app.com
In a new command line window, we’ll first try to run a kubectl command. In this case, we’re not yet authenticated and do not have any permissions for the session—this results in an authorization error:
> kubectl get nodes -o wide
error: You must be logged in to the server (the server has asked for the client to provide credentials)
Next, we’ll call the credential process stored in the AWS credentials file to invoke the Britive checkout function to fetch short-lived credentials and the “eks-pod-manager” role:
> aws sts get-caller-identity --profile eks-pod-manager
{
    "UserId": "AROAS3L75VZINZRO3JKLX:[email protected]",
    "Account": "196226166352",
    "Arn": "arn:aws:sts::196226166352:assumed-role/EKS-Pod-Manager/[email protected]"
}
Next, we’ll set the environment variable which will allow kubectl to utilize the correct AWS profile; “eks-pod-manager” in this case:
> export AWS_PROFILE="eks-pod-manager"
Now that our environment is ready we’ll try a few kubectl operations and analyze the results:
> kubectl get pods --all-namespaces
NAMESPACE     NAME                       READY   STATUS    RESTARTS   AGE
kube-system   aws-node-fdvj9             1/1     Running   0          9h
kube-system   aws-node-n85sg             1/1     Running   0          9h
kube-system   coredns-769569fd5d-rr7mz   1/1     Running   0          9h
kube-system   coredns-769569fd5d-tpfmr   1/1     Running   0          9h
kube-system   kube-proxy-52dzs           1/1     Running   0          9h
kube-system   kube-proxy-s6wdj           1/1     Running   0          9h
Now, let’s run a few kubectl auth can-i commands to see what we can do with these credentials:
> kubectl auth can-i 'list' 'pods'
yes

> kubectl auth can-i 'patch' 'pods'
yes

> kubectl auth can-i 'list' 'services'
no

> kubectl auth can-i 'list' 'secrets'
no

> kubectl auth can-i 'create' 'secrets'
no
In the example above, the user first tries to perform a kubectl action to list all nodes. Since the user does not have the right permission and is now logged in, the API server returns an error. In the following step, the user leverages the pre-configured AWS credentials file to set up a profile session by using the aws sts get-caller-identity command and one of the profiles we configured in the previous step. By exporting an environment variable we let kubectl know which AWS profile to use, so we see the export AWS_PROFILE action in both scenarios. The user then established a successful connection to the EKS cluster and was able to carry out respective operations. By leveraging the kubectl auth can-i command we can demonstrate the individual permission that each session carries.
Conclusion
As you can see with this example, implementing JIT access in your Amazon EKS clusters with varying levels of permissions is straightforward with Britive. Our unique command line interface coupled with our management console empowers developers to quickly configure and provide the right level of access for human counterparts who in turn can be more productive.
Learn more about Britive’s unique approach to enabling rapid access to cloud infrastructure, data, applications, and explore details around our Kubernetes integration by requesting a demo today.